
Here I’ll show you the easiest and most delicious way to roast a chicken and serve it in a sandwich!
Soft and juicy roast chicken, salty crispy chicken skin, rich homemade gravy and lashings of butter, all wedged between two slices of soft white bread. Sound good? Follow me…

Spatchcock Chicken
I genuinely can’t remember the last time I roasted a chicken without spatchcocking it. It gives you THE best roast chicken every single time. Now, if you’ve never spatchcocked a chicken before, don’t panic. It’s ridiculously simple.
What is a spatchcock chicken?
Spatchcocking a chicken, otherwise known as butterflying a chicken, simply means removing the backbone. By doing this you can then open out and flatten the chicken.
Why spatchcock a chicken?
- Time – It significantly reduces the roasting time, usually by almost a half!
- Tender – Because the chicken is flat, the meat cooks far more evenly. As such, the chicken comes out much juicier.
- Variety – Spatchcocked chicken is great to roast, but it’s also great to grill/BBQ too!

Garlic Thyme Butter
Before we get started on the chicken, the first thing we’re going to do is whip up a quick & easy butter. Chicken can take on an array of different flavours, but today we’re keeping it simple. In reality, you don’t need the fuss, especially if it’s going in a sandwich. For the butter, here’s what you’ll need:
- Butter – Preferably unsalted so you have more control over the saltiness. Bring it close to room temp so it’s easier to mix.
- Thyme – Chicken and thyme are a match made in heaven. It gives the chicken a nice undertone of flavour without overpowering with herbs.
- Garlic – Very finely diced/grated.
- Lemon – Zest only. The juice will add moisture, which in turn will prevent the chicken skin from crisping up.
- S&P – As needed.
Process shots: add ingredients to small pot/bowl (photo 1), mash to combine (photo 2).

Preparing the Chicken
When it comes to preparing the chicken, here are 3 things to consider:
Room temp chicken
A rookie error when cooking meat in general, is cooking it straight from the fridge. Not only will this cause the meat to cook unevenly, but it also increases the chance of the meat coming out tough and dry. I recommend having the chicken close to room temp before you start prepping.
Patting Dry
I know this might seem excessive, but it’s an important step. By patting the chicken dry you not only make the chicken easier to handle, but you also remove moisture. The less moisture on the skin the better it’ll crisp up.
Removing the backbone
To do this all you need is a pair of kitchen shears (or any heavy-duty kitchen scissors). Just start at one end of the chicken and cut along as close to the backbone as possible. You can save the backbone for stock at a later date if you wanted.
Process shots: add chicken to chopping board breast side up (photo 1), pat dry (photo 2), flip (photo 3), pat dry (photo 4), cut out backbone (photos 5, 6 & 7), remove (photo 8).

Spatchcocking the Chicken
Removing the backbone is the hardest part, and even that is simple (as you can hopefully tell!). To spatchcock it you just want to open out the chicken. To do this you can make a slice on the sternum and open out that way, or just flip the chicken over and push down on the breasts until it flattens. Either way, the chicken must be as level/flat as possible so it cooks evenly.
Butter UNDERNEATH the skin
At this point you can add the butter, just make sure it’s underneath the skin. The reason is you want to protect the thyme, garlic and lemon zest from direct heat so they don’t burn. This way the actual meat will soak up the flavours, instead of just the skin.
To add the butter just use a spoon to loosen up the chicken skin, then slather the butter underneath.
Process shots: gently open chicken after removing backbone (photo 1), slice sternum (photo 2), flip and flatten (photo 3), loosen skin (photo 4), add butter (photo 5), spread across chicken (photo 6).

Roasting the Chicken
When it comes to roasting the chicken I love using a big cast iron skillet. Mainly because you can collect all the juices and make a gravy in the same pan. However, you can also use a large tray if that’s all you have.
To roast the chicken you’ll want to add a few goodies underneath (thyme, lemon, garlic, onion) just to infuse more flavour AND make a delicious base for the gravy. These ingredients can also help make a mini podium for the chicken to help it stay level as it roasts. Again, this is important so the meat cooks evenly.
The last thing is making sure you give the skin a heavy seasoning of salt and pepper, then a good drizzle of olive oil. Just so it crisps up nicely!
Process shots: add lemon, thyme, garlic and onion to cast iron skillet or tray (photo 1), add chicken and tuck in wings (photo 2), coat in salt, pepper and oil (photo 3), roast (photo 4).

Roast Chicken Gravy
Almost there! We just can’t waste all that gorgeous flavour left in the pan after roasting the chicken 😋
Resting the Chicken
This is important to keep the meat juicy. If you slice straight into the meat after it’s roasted, the juices will just pour out. Allowing the chicken to rest will help it retain its juices. Just carefully remove from the pan and leave the juices/fat in the pan behind.
Homemade Chicken Gravy
To make the gravy you only need flour and chicken stock. Most of the flavour will come from the fat/juices left in the pan! Just make sure the gravy is nice and thick, especially because it’s going in a sandwich.
Process shots: remove chicken (photo 1), remove ingredients underneath (photo 2), place pan on heat (photo 3) stir in flour (photo 4), whisk in chicken stock (photo 5), simmer to thicken (photo 6).

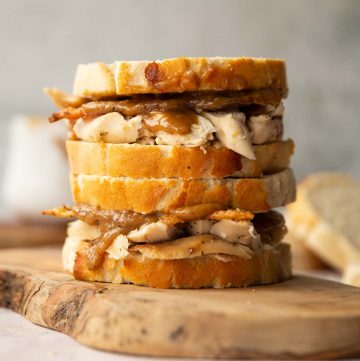
Roast Chicken Sandwich
Wondering what you can add to a roast chicken sandwich? The answer is nothing. That’s right, just good old fashioned bread and butter, alongside the chicken, chicken skin and gravy is all you need. Promise!
What Bread to use?
Gotta be Tiger Bread! It’s gorgeously soft with a nice chewy crust. If you’re outside the UK use any type of soft white bread.
Keeping the Chicken Skin Crispy!
If you find the skin has wilted a little as the chicken rests, just peel off the skin and whack it in the oven for a few mins to crisp it up. The crispy skin adds a nice crunch to the sandwich, so I recommend this extra step if needed!
Process shots: slice bread (photo 1), add butter (photo 2), add chicken (photo 3), add chicken skin (photo 4), add gravy (photo 5), add bread (photo 6).

Serving Roast Chicken Sandwiches
Make sure you serve them up quick, just so they’re warm!
What can I do with leftover chicken?
If you’ve got any leftover meat, I’ve got you covered. Check out my Leftover Chicken Sandwiches!
What can I serve with roast chicken sandwiches?
Some crisps/chips are always a good time! Smoky Bacon or Cheese & Onion flavour are my faves. You can also add a Side if you fancy – some Coleslaw or a Roasted Veggie Salad works nicely!
Alrighty, let’s tuck into the full recipe for these roast chicken sandwiches shall we?!

How to make Roast Chicken Sandwiches (Full Recipe & Video)
Roast Chicken Sandwiches
Equipment
- Large Cast Iron Skillet (12"+) or Large Baking Tray & Small Pot (for roasting chicken/gravy)
- Heavy Duty Scissors/Kitchen Shears (for spatchcocking chicken)
- Sharp Knife & Chopping Board (for dicing garlic/thyme)
- Small Pot (for making butter)
- Zester/Fine Cheese Grater (for zesting lemon)
- Paper Towels (to pat chicken dry)
- Wooden Spoon (for gravy)
- Tongs (for gravy)
- Jug (for stock)
Ingredients
Roast Chicken
- 1x 3.3lb/1.5kg Whole Chicken, take out fridge 30mins before needed
- 2 tbsp Unsalted Butter, close to room temp
- 2 cloves of Garlic, very finely diced or finely grated (plus 1 bulb extra sliced in half to place underneath chicken)
- 1 tsp finely diced Fresh Thyme, plus a handful more sprigs to place underneath chicken
- 3 small Onions, quartered (to place underneath chicken)
- 1 small Lemon, zested then slice two thin rounds (place two rounds underneath chicken)
- 1/2 tsp Salt, plus more as needed
- 1/4 tsp Black Pepper, plus more as needed
- Olive Oil, as needed
Gravy
- 2 cups / 500ml Chicken Stock
- 3 tbsp Flour
- squeeze of Honey (optional)
- squeeze of Lemon (optional)
- Salt & Black Pepper, to taste
Sandwich
- 10-12 small but thick slices of Tiger Bread, or other soft white bread
- Butter, as needed
Instructions
- Oven: Preheat the oven to 220C/425F.
- Butter: In a small pot combine butter, garlic, thyme, lemon zest, salt and pepper. Place to one side.
- Prep Chicken: Place chicken on a large chopping board breast side up. Pat dry with paper towels, then flip so it is breast side down with the back bone facing you. Pat dry.
- Remove Back Bone: Using a pair of kitchen shears, cut through the ribs directly on either side of the backbone. Start at the butt or the neck, just try and go as close to the backbone as you can, just so you don't remove too much of the chicken. Completely remove the backbone (you can use this another time for stock) and gently pull open up the chicken.
- Flatten Chicken: Use a knife to slice along the sternum. This will help the breast bone pop out (not a crucial step, but it does help. See video below if you're not sure where this is). Season the inside with a pinch of salt and pepper. Flip the chicken over and firmly push down the breasts to flatten the chicken.
- Butter Chicken: Use a spoon to loosen the skin by pressing it in between the meat and skin. Do this on both the breasts and legs. Add the butter underneath the skin and use your fingers to distribute it across the chicken.
- Prep for Roasting: On a large baking tray or cast iron skillet, add onion, thyme, lemon rounds and garlic bulb halves. Place the chicken directly on top, and move about the onion wedges to make sure the chicken is as level as possible. Tuck the wings under the chicken, then coat in a heavy seasoning of salt and pepper, alongside a good drizzle of olive oil.
- Roast: Place in the oven for 45mins. The internal temperature should be 75C/165F with the juices running clear when pierced at the joint between the drumstick and the body (will rise a couple of degrees as it rests).
- Gravy: Remove chicken and place to one side to rest for 10-15mins (important so it stays juicy). Use tongs to remove ingredients underneath the chicken and give them a good squeeze, just so you don't waste any flavour. If you're using a baking tray pour the leftover fat/juices into a pot. Place pot or cast iron skillet over medium heat and stir in 3 tbsp flour. Gradually add chicken stock and simmer until nice and thick, stirring as you go to avoid lumps forming. Test for seasoning and adjust accordingly, add a squeeze of lemon/honey if you want as well (balances out any bitterness caused by excess char).
- Sandwich: Remove skin from chicken. If it's lost it's crisp, place it in the oven for a few mins to crisp up again at 180C/350F. Remove meat from the chicken and slice up. Spread one side of each of your slices of bread with butter. Top with chicken, then chicken skin, then drizzle with gravy. Top with second slice of buttered bread then tuck in and enjoy!
Quick Demo
Notes
Your Private Notes:
Nutrition:
If you loved this Roast Chicken Sandwich Recipe be sure to Pin it for later! Already made it or got a burning question? Give me a shout in the comments below!

This was, without a doubt, the best roast chicken I have ever tasted. Thank you!!!
Great to hear, Dave! Thanks for the review 🙂