These Foil Packet Nachos are fully customizable, quick & easy to make and result in less washing up – what’s not to love?!
Ready to make the easiest nachos of your life? Follow me…
Foil Packet Nachos
Why make nachos in foil?
- Individualize – The main reason for me is that you can completely customize individual portions. This recipe makes 4, and I bet the 4 people you’re serving are gonna want different toppings. You can even go as far as to completely change the cheese and flavour of tortilla chips for each portion!
- Ease – No need to use a tray (which usually results in scraping off cheese). Just bung the individual packets in the oven and that’s it!
What makes these a great sandwich side?
Ideally if you’re whipping up a side dish for your sandwich you want it to be a) easy and b) finger food. These individual nachos cover both of those bases. Think of them as a levelled up bag of chips/crisps!
How to make Foil Packet Nachos (quick summary)
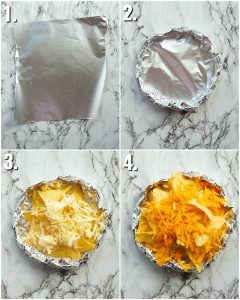
- Tear aluminium foil into square.
- Fold edges to make dish.
- Add tortilla chips and cheese.
- Add more tortilla chips and cheese then bake.
Individual Nachos
What Cheese to use?
Like I mentioned earlier, you can use different cheeses for different portions. Here I use Monterey Jack for one layer and Cheddar for the other.
Nacho Topping Ideas
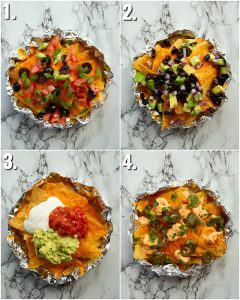
Now here’s where the party really gets started. Here I’ve just whipped up 4 different combos which use 3 simple ingredients in each:
- Combo 1: Tomatoes, Olives, Spring Onion.
- Combo 2: Avocado, Black Beans, Red Onion.
- Combo 3: Salsa, Guac, Sour Cream.
- Combo 4: Queso, Jalapeños, Coriander/Cilantro.
Feel free to use any toppings/combo you fancy though! You can do all the same, some the same or all completely different.
Tips for the best Foil Packet Nachos
- Tortilla Chip – Try and buy a ‘sturdy’ variety of chip, just so they don’t easily break/turn to mush.
- Time – Ensure you only bake them until the cheese JUST begins to melt. Don’t over do it or the chips will stick together and/or the foil.
- Foil – Try and buy ‘heavy duty’ foil to avoid the cheese sticking to the foil too much.
And there we have it! All my top tips for the best individual nachos. Whilst you’re here be sure to check out all my sandwich sides!
Let’s tuck into the full recipe shall we?!
How to make Foil Packet Nachos (Full Recipe & Video)

Individual Nachos (Foil Packet Nachos)
Equipment
- Heavy Duty Aluminium Foil
- Sharp Knife & Chopping Board
Ingredients
- 7oz / 200g Tortilla Chips
- 1 cup / 100g Monterey Jack, or as needed (can sub cheese of choice)
- 1 cup / 100g Cheddar, or as needed (can sub cheese of choice)
- Selection of Toppings (see notes)
Instructions
- Unwrap foil and cut into 4x 12" squares (usually the same size as the width of the foil). Scrunch around the edges to form 'dishes' for the nachos.
- Add tortilla chips, top with cheese, add more tortilla chips then finish with more cheese. Pop in the oven at 180C/356F for 5-10mins or until the cheese begins to melt. Don't over do it or the tortillas with stick together and to the foil.
- Sprinkle over your preferred toppings/dips. Enjoy right away!
Quick Demo
Notes
- Combo 1: Tomatoes, Olives, Spring Onion.
- Combo 2: Avocado, Black Beans, Red Onion.
- Combo 3: Salsa, Guac, Sour Cream.
- Combo 4: Queso, Jalapeños, Coriander/Cilantro.
Your Private Notes:
Nutrition:
Love Nachos AND Sandwiches? Check out my Chicken Nacho Sandwich!
If you loved this Individual Nachos Recipe be sure to Pin it for later! Already made it or got a burning question? Give me a shout in the comments below!


Love this! I can let everyone customize their own nacho toppings so there’s no preferential treatment. 😉 Plus, cleanup is practically non-existent. 🙂
Yep you got it!! 🙂
This is maybe the best idea this year – no clean-up and a fun way to serve it. I’m in!
Thanks so much 🙂
What a super cool idea. Pefect for parties and game night. Everyone can create their own signature dish. LOVE it.!
Thanks Gloria 🙂
These are SUCH a good idea! Everyone gets their way 🙂 I’m all about the jalapenos on my packet!
Yesssss! Gotta be some jalapenos!
Really like this idea! It is so time saving!
Thanks! 🙂